Program an Arduino is very simple, you don’t need any AVR programmer because the bootloader permit a programming through the serial port. For program an ATmega88/128/328 without the Arduino bootloader, you can turn your Arduino into an AVR ICSP programmer (In-Circuit Serial Programming). In order to perform it you have to program your board with the sketch Arduino as ISP available in Arduino software. When it’s done, you have to wire the ATmega to the Arduino board like this:
Schematic
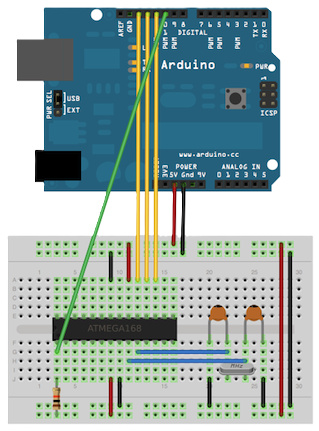
Note: In fact the ISP programming use SPI pins of the ATmega and realise a BitBang programming.
Next we have to install a soft which permit to program the ATmega with a ISP programmer like WinAVR under windows or avrdude under linux. The soft installed, we can create a project (test.c) with the tool “Programer’s Notepad” installed with WinAVR. Compile this blinking LED example (Clean then Make) which produce test.hex.
Program (test.c)
#include <avr/io.h>
#include <avr/delay.h>

void main (void)
{
  unsigned char counter;
  DDRD = 0xFF; //PORTB in output

  while (1)
  {
    PORTD |= 1<<2; //PORTB BIT 2 = 1
    counter = 0;

    //Wait 1 sec (16MHz)
    while (counter != 100)
    {
      //(40000 x 4) cycles = wait 160000 cycles
      _delay_loop_2(40000);
      counter++;
    }

    PORTD &= ~(1<<2); //PORTB BIT 2 = 0
    counter = 0;

    //Wait 1 sec (16MHz)
    while (counter != 100)
    {
      _delay_loop_2(40000);
      counter++;
    }
  }

  return 1;
}
The next step consist to program the chip with avrdude.
First solution (command line)
Open the commmand line, go to your project directory, and write this in order to see if the chip is alive:
$ avrdude -p atmega328p -c avrisp -P com3 -b 19200
The command line return:
avrdude: AVR device initialized and ready to accept instructions Reading | ######################################### | 100% 0.13s avrdude: Device signature = 0x1e950f avrdude: safemode: Fuses OK avrdude done. Thank you.
Now we can program the chip:
$ avrdude -p atmega328p -c avrisp -P com3 -b 19200 -U flash:w:test.hex
Tada! you can see your LED blink and these lines:
avrdude: AVR device initialized and ready to accept instructions

Reading | ######################################### | 100% 0.11s

avrdude: Device signature = 0x1e950f
avrdude: erasing chip
avrdude: reading input file "test.hex"
avrdude: input file test.hex auto detected as Intel Hex
avrdude: writing flash (116 bytes):

Writing | ######################################### | 100% 0.13s

avrdude: 116 bytes of flash written
avrdude: verifying flash memory against test.hex:
avrdude: load data flash data from input file test.hex:
avrdude: input file test.hex auto detected as Intel Hex
avrdude: input file test.hex contains 116 bytes
avrdude: reading on-chip flash data:

Reading | ######################################### | 100% 0.13s

avrdude: verifying ...
avrdude: 116 bytes of flash verified

avrdude: safemode: Fuses OK

avrdude done.  Thank you.
Second solution (Programmer’s Notepad)
you have to copy the makefile present in sample directory in your directory and change these lines, first change the MCU name:
MCU = atmega328
Processor frequency:
F_CPU = 16000000
Target file name (without extension):
TARGET = test
Programmer:
AVRDUDE_PROGRAMMER = avrisp
Serial port (com3 for me):
AVRDUDE_PORT = com3
and finally:
AVRDUDE_FLAGS = -p $(MCU) -c $(AVRDUDE_PROGRAMMER) -P $(AVRDUDE_PORT) -b 19200
Now you can program with the Programmer’s Notepad (Clean => Make => Program) and see your LED blink !
Issue for ATmega88 Programming
In order to program an ATmega88 you need to edit avrdude.conf, change the signature by:
signature = 0x1e 0x93 0x0f;
Save, and edit the makefile and change these line:
MCU = atmega88
And,
AVRDUDE_FLAGS = -p m88 -c $(AVRDUDE_PROGRAMMER) -P $(AVRDUDE_PORT) -b 19200
Save, program and see !